


Odin Inspector란?
오딘 인스펙터는 커스텀 에디터 코드를 한 줄도 작성하지 않고도 강력하고 사용자 친화적인 커스터마이징 에디터의 모든 워크플로 이점을 누릴 수 있는 Unity용 플러그인입니다.
개발자는 수천 줄의 커스텀 에디터 코드를 작성하고 유지 관리하는 대신 100개 이상의 빌딩 블록 속성으로 데이터 구조에 주석을 달아 전체 팀을 위한 사용자 친화적인 에디터를 빠르고 쉽게 빌드할 수 있습니다.
Odin Inspector and Serializer | Improve your workflow in Unity
Odin Inspector is a plugin for Unity that lets you enjoy all the workflow benefits of having a powerful, customized and user-friendly editor, without ever having to write a single line of custom editor code.
www.odininspector.com
Odin Inspector를 사용해야하는 이유
Odin을 활용한 생산성 팁: 툴을 이용하여 툴 만들기 | Unity Blog
인스펙터 변수가 많은 대규모 스크립트는 보기에도 불편하고 추적하기에도 어려움이 따를 수 있습니다. Odin에서는 그룹을 사용하여 이 문제를 해결합니다. 그룹을 활용하면 관련 프로퍼티를 결
blog.unity.com
🔧 Odin은 Unity 프로젝트의 사용자 정의 도구 개발에 유용한 도구입니다.
🔍 Odin은 사용자 정의 검사기와 에디터 창을 생성하여 작업 흐름을 자동화합니다.
즉, Odin은 사용자 정의 에디터 도구를 생성하여 작업 흐름을 자동화하고 코드 구현을 더 신뢰할 수 있게 만들어주는 도구입니다.
초보자들은 처음에는 Editor 도구를 필요로 하지 않을 수 있지만, 프로젝트가 복잡해지면 사용자 정의(Editor)를 사용하여 Inspector를 수정하는 작업이 필수적이게 됩니다.
Odin이 없으면 새로운 Edtior Script를 생성하고 각 필드를 재작성해야 하는 번거로움이 있습니다.
Odin을 사용하면 기존에 사용하던 스크립트의 필드와 함수에 속성을 추가하여 Inspector를 수정할 수 있으며, Edtior Script를 생성할 필요가 없어져 클래스를 변경하는 것이 더 쉽고 빠릅니다.
Unity Custom Editor
💡Custom Editor Custom Editor란 Unity에서 Editor를 커스터마이징 한다는 뜻이다 커스터마이징을 통해 개발자들은 유니티 에디터 자체에 특정 기능을 추가할 수 있다 예를 들면, 인스펙터창에 특정 버튼
wlsdn629.tistory.com
위 블로그 포스팅은 Editor 스크립트를 이용하여 SpawnMonster 스크립트를 수정한 방법입니다.
오딘을 사용하지 않을경우 위 포스팅대로 SpawnMonster스크립트를 인스펙터에서 수정하려면 SpawnMonster스크립트를 위한 새로운 Editor 스크립트를 만들어야만 했습니다.
하지만, 오딘을 사용할 경우 새로운 Editor 스크립트 필요 없이 바로 스크립트를 수정해서 인스펙터를 커스터마이징 할 수 있다는 뜻입니다.
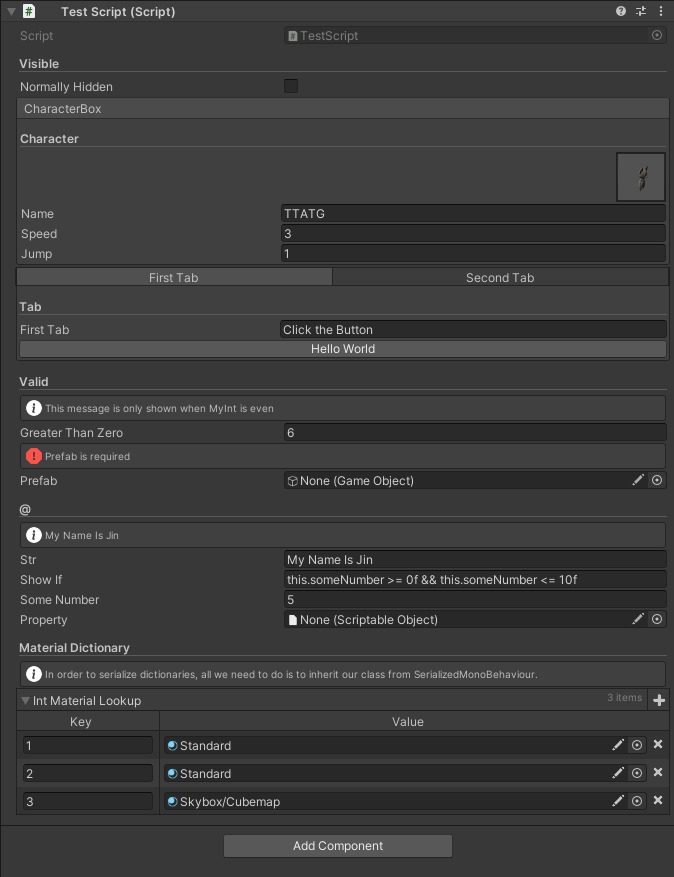
오딘의 강점 중 하나는 Dictionary를 Inspector에 노출시킬 수 있다는 점입니다.
Unity 기본 Dictionary경우에는 Inspector창에 노출시킬 수 없습니다.
아래 토글을 펼치시면 사용한 코드를 보실 수 있습니다.
using System;
using System.Collections.Generic;
using UnityEngine;
using Sirenix.OdinInspector;
using Sirenix.OdinInspector.Editor.Examples;
using Sirenix.Serialization;

public class TestScript : SerializedMonoBehaviour
{
    #region Visible

    [HideInInspector]
    public int NormallyVisible;

    [Title("Visible")]
    [ShowInInspector]
    private bool NormallyHidden;

    [ShowInInspector]
    public ScriptableObject Property { get; set; }

    #endregion

    #region Tab
    [Title("Character")]

    [BoxGroup("CharacterBox")]
    [HideLabel, PreviewField, AssetsOnly]
    public GameObject CharacterVisual;

    [BoxGroup("CharacterBox")]
    public string Name;

    [BoxGroup("CharacterBox")]
    public float Speed;

    [BoxGroup("CharacterBox")]
    public float Jump;


    [Title("Tab")]
    [TabGroup("First Tab")]
    public string FirstTab;

    [TabGroup("First Tab"), Button]
    public void HelloWorld()
    {
        Debug.Log("Hello World!");
    }

    [TabGroup("Second Tab")] public string SecondTab;
    [TabGroup("Second Tab"), Button]
    public void ByeWorld()
    {
        Debug.Log("Bye World!");
    }

    #endregion

    // #region GroupBox
    // [FoldoutGroup("Buttons in Boxes")]
    // [HorizontalGroup("Buttons in Boxes/Horizontal", Width = 90)]
    // [BoxGroup("Buttons in Boxes/Horizontal/One")]
    // [Button(ButtonSizes.Small)]
    // public void Button1() { }
    //
    // [BoxGroup("Buttons in Boxes/Horizontal/Two")]
    // [Button(ButtonSizes.Small)]
    // public void Button2() { }
    //
    // [Button]
    // [BoxGroup("Buttons in Boxes/Horizontal/Double")]
    // public void Accept() { }
    //
    // [Button]
    // [BoxGroup("Buttons in Boxes/Horizontal/Double")]
    // public void Cancel() { }
    //
    //
    // #endregion

    #region Valid
    [Title("Valid")]
    [ValidateInput("IsValid")]
    [InfoBox("This message is only shown when MyInt is even", "IsEven")]
    public int GreaterThanZero;

    private bool IsValid(int value)
    {
        return value > 0;
    }

    [Required, OnValueChanged("UpdateRigidbodyReference")]
    public GameObject Prefab;

    private Rigidbody prefabRigidbody;

    private void UpdateRigidbodyReference()
    {
        if (this.Prefab != null)
        {
            this.prefabRigidbody = this.Prefab.GetComponent<Rigidbody>();
        }
        else
        {
            this.prefabRigidbody = null;
        }
    }

    #endregion

    #region @
    [Title("@")]
    [InfoBox("@str")]
    public string str;

    [ShowIf("@this.someNumber >= 0f && this.someNumber <= 10f")]
    public string showIf;

    public float someNumber;

    #endregion

    #region Serializable Dictionary

    [Title("Material Dictionary")]
    [InfoBox("In order to serialize dictionaries, all we need to do is to inherit our class from SerializedMonoBehaviour.")]
    [PropertyOrder(10)]
    public Dictionary<int, Material> IntMaterialLookup;

    [OnInspectorInit]
    private void CreateData()
    {
        IntMaterialLookup = new Dictionary<int, Material>()
        {
            { 1, ExampleHelper.GetMaterial() },
            { 2, ExampleHelper.GetMaterial() },
            { 3, ExampleHelper.GetMaterial() },
        };
    }

    #endregion
}
Odin Inspector / Window
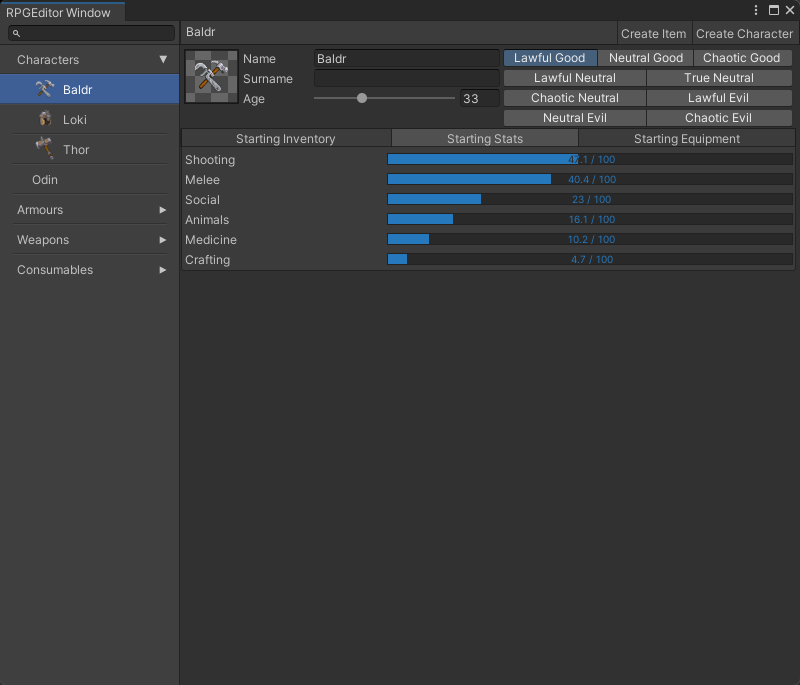
Odin을 이용하면 인스펙터 뿐 만 아니라 윈도우창도 손쉽게 커스터마이징 할 수 있습니다.
Odin을 이용하면 코딩 없이 주어진 샘플을 이용하여 바로 시작할 수 있습니다!
개발시간을 단축시켜주는 것 뿐 만 아니라, Drag & Drop에서의 실수도 줄여주며, 디자이너와의 소통이 원활해질 수 있는 강력한 도구인 오딘 인스펙터! 를 사용안할 이유는 없겠죠?!
TMI이지만 오딘인스펙터의 많고 많은 장점중에 3가지를 뽑아보자면 아래와 같습니다.(아직 오딘 응애인 저에게는 이정도 기능만으로 값어치를 똑똑히 합니다!)
- Preview 기능과 Required기능
- Insepctor에 자료형(ex. Dictionary) 노출
- Editor Script 생성 X, 스크립트 하나로 모든게 해결가능 O
Odin Inspector를 사용하는 방법
유니티 Odin Inspector 사용방법
안녕하세요. 오늘은 저번 시간 Odin Inspector소개 이후 실제 사용후기 및 사용방법에 대해 말해보고자 합니다! 유니티 Odin Inspector Odin Inspector란? 오딘 인스펙터는 커스텀 에디터 코드를 한 줄도 작
wlsdn629.tistory.com
구매 링크💲
이 글은 어필리에이트 링크를 포함하고 있습니다.
위 링크를 클릭하셔서 애셋을 구매하시면 저에게 수수료가 제공됩니다.
링크를 클릭하는 것으로는 수익이 발생하지 않습니다!
감사합니다!